You can use UI tests to verify the behavior of audio or video players in your app, but they may fail on a CI/CD environment. You can find the fix in this post.
Before going any further, let’s quickly get to the bottom of the issue. CI providers use virtual machines without sound because they are primarily used for running automated tests and building software projects, rather than for tasks that require audio output. When test runner opens the media player on your app, the app will do nothing. Interestingly enough, it won’t even crash -simply will remain silent on the player screen (pun intended).
One fix I found on the internet is attaching a null audio driver before running UI tests. Here’s how I do it in my CircleCI config:
We clone a repository named BackgroundMusic. We use a specific version as they seem to have removed the code we need in the following versions.
We build the NullAudio project and attach it to the system
We delete the code that’s no longer needed.
With this fix, your UI tests should run as they do locally. One important thing to note here is that we are using an old version of the repository from 5 years ago and you might encounter warnings on your CI when building the audio driver project (might even crash on the future versions of MacOS). I’ll be sure to update here if I’ll have to come up with a fix for that.
I created a small project which demonstrates this scenario and has the fix. Here’s the GitHub link.
Last week, I attended Bitrise’s Mobile DevOps Summit 2022. It was a one-day virtual event packed with dozens of talks from people all around the world. As someone who spent more than ten years in mobile development and has a full-stack background, let me start by appreciating the notion of “Mobile DevOps” and Bitrise for taking it seriously. If I’m being honest, there were times in my career when the usual DevOps felt like force-fitting for the mobile and it’s great to see the shift in how the industry is approaching mobile-related operations nowadays.
If you haven’t heard of this event or didn’t have the time to participate, I highly recommend checking out the agenda and watching the sessions you find interesting, they’re all available on demand.
Before sharing my picks below, I’ll say a few words on the event. When I saw the agenda for the first time, with 25-min talks back to back within almost 8 hours and in parallel, I wasn’t expecting to survive after the first half. Things actually played out quite nicely for me, and I think the credit goes both to the speakers for preparing their talks short and concise as well as to the moderators for being mindful about the time. Although sometimes the talks were just cut-off after the 25-min remark, most of the times there were enough time to wrap things up.
Ever since I started to feel like getting a grasp of BDD and its potential, I never stopped thinking about the ways of implementing it. I believe it’s a never-ending process – there’s no one-size-fits-all way of doing it, and that’s the exciting part. But what are some practices to apply on the fundamentals to make your life much easier as you invest more time on the upper layers of your test suite? Look nowhere else because this talk will give you lots of food for thought.
There are a lot of “easier said than done” things in software engineering. Release process is definitely one of them.
Have you ever worked on a project where you built the right thing, you built it well and it works and everyone’s happy, you pop the cork in the champagne and then you find out that it’s not going to be deployed for three months?
If you want to know what situation your company is in, try to deploy “hello world” and see how long it takes.
Okay, this talk might not be about the example I quoted above, but I don’t think it’s too far away as it’s for shortening the release cycle. How easy is it to reduce your release cycle by one day? Maybe fairly. Two days? What about three? If you are releasing bi-weekly, then what about cutting it in half!?
So, what I liked about Wyatt Webb’s speech is that it’s not a concept, it’s a demonstration and an aftermath. I believe there’s a lot to learn there, but thankfully for us, from the easy way.
Can you get away with not speaking about automation and optimization in a DevOps event hosted by a CI/CD platform? (Why would you, anyway) This one is a bit more technical and iOS/macOS oriented – Philipp impressed me with great tips and tricks for getting the best out of Apple frameworks for your CI.
I always wanted to be a regular reader – a person who reads at least several books a year, if not a month. I tried ways like setting goals for intrinsic motivation or publishing progress for extrinsic. Purchasing a Kindle was another step in that direction, taken more than a decade ago.
Just like the other things, the Kindle didn’t help. Not that I had a problem with the product, I just didn’t know what to expect from it. Although it took me a while, I finally came up with my own strategy for being a regular Kindle user. Below you can find what I discovered along the way.
1. I cannot replace physical books with Kindle
Whenever I wanted to read a book, I would first look for the Kindle version. I always thought the activity of reading would be much easier that way. This may be true, but it just isn’t enough for me. I’ve come to realize that I enjoy reading physical books most of the time and don’t mind the inconvenience of holding them or rotating their pages.
2. I must keep myself away from distractions, physically
Even when I am reading something on Kindle, any kind of phone notification or a “quick”Google search can get me drifted away from the current activity for good. In order to avoid that, I position myself in the farthermost corner of the room from any other screen. “Just don’t look at other screens” doesn’t really work for me.
3. I must manage my mental capacity wisely
If you are not a native English speaker, an English-to-English dictionary sometimes does more harm than good. Even if you have no problems understanding it, your brain still works much more than it would with an English-to-your-language dictionary. Then, reading becomes exhausting and less appealing over time. Using a dictionary in your language significantly reduces this mental overhead. The great thing about Kindle is being able to use multiple dictionaries at a time, so, you can still resort to alternative translations.
These are all about how I think I should use my Kindle, what about what I should use it for?
Contrary to this post, I figured out what before how. As my inbox was flooded with new issues of engineering and leadership newsletters every week, I tried to read my way out of them pertinaciously. This turned out a failure on a computer for two main reasons: It didn’t feel very healthy for my eyes and I was keen on dropping reading as soon as I get a distraction. Printing the newsletters wasn’t an option either as it didn’t feel sustainable in the long run and was environmentally questionable. That’s when I was reminded of my Kindle, laying in some drawer, out of battery for weeks (maybe even months).
So here’s what I’ve been trying for a couple of months: Once or twice a week, I skim through the newsletters in my inbox and send the ones that look interesting over to my Kindle. Most of the issues I receive contain lists of other articles so there are a lot of links I need to go through, but the whole exercise does not take more than 10-15 minutes.
Successes
Sending to Kindle is somewhat convenient (on an iPad or using the Chrome extension): I just share the webpage via the Kindle app/extension and it appears on the device with a reasonably good layout
My inbox remains clean and up-to-date
As I don’t keep seeing unread newsletters, I am less anxious about them
Improvement areas
After just a couple of weeks, the content on Kindle is too hard to manage. Using collections helps, but the slow hardware doesn’t (I recently discovered that I can organize the collection on my phone which is in sync with Kindle)
Moving the unread content from my inbox to my Kindle gives a false sense of accomplishment: I have to keep reminding myself that I must read what’s in my Kindle inbox before there’s more
Layout issues on the output when the source material is enrichened with embedded HTML, like tweets, etc.
Delivery to Kindle part feels less fun every day and is hard to automate
Optimization comes after going from 0 to 1, that is why I am still in the process of evaluating successes and consistency before setting my eyes on things to improve. Thankfully, there’s nothing that’s not workable.
See my instantaneous and continuous reading lists from here.
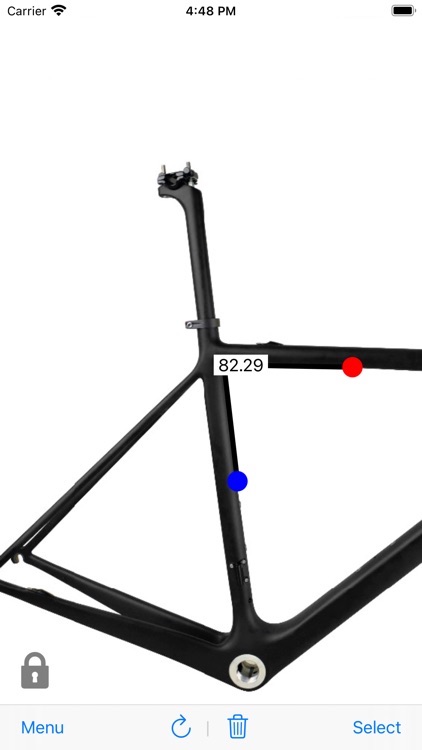
Back in the day when I was getting into cycling, although I didn’t know what to expect, I knew one thing for sure: I had to pick the bike with the right frame. It didn’t take too long until I found myself inside an ocean of parameters because I came to notice that bike frames had many attributes alongside the size. One of them was the angles of where the parts meet each other and depending on these, the bike would give you a different ride experience like a comfortable one, or an aerodynamic one, and such.
I was serious, and I had to pick not just any frame, but the best for my needs. Well, there was a problem: Not every buyer or seller cared about every detail, and I wasn’t able to find all the details of the frames I was looking at, more specifically, the angles within the frame body.
So I came up with an idea: How about I make a small app that’s just for solving the problem at hand: Measuring the angles on a given photo. Did I do that right away? Yes. Did I use it for measuring angles on bike frames? Yes. Did I get the “best” frame for myself? No, but that’s another topic. What followed all of these is that I decided to put that app on the app store. It was awfully primitive, probably had the worst UX ever, and the code behind was… Catastrophic, to say the least. But I wasn’t expecting anything, to be honest. It was a small effort for me to publish and I would be more than happy if it just helped someone, somehow.
The app was being downloaded and used over the years, but I wasn’t getting any feedback, although that was fine. The thing about the internet is that it’s like a sea into which you throw your bottle with a note. You don’t know what will happen to the bottle, or if someone will ever read your note, but most importantly, whether you’ll ever get a response. Because we all fetch other people’s bottles, but we don’t always respond.
Well, after 3 years, I received a bottle. It was from a senior who presented himself as “a blue-collar guy or laborer” who had an injury at work and would never be the way he was. He had to measure the angles of the stairs he fell to see whether they match the industrial staircase requirements. He wanted my help because he thought that he was not educated in this discipline although it was a simple calculation (I told you that the app UX was horrible). He wanted to pay me for my service but I refused since I was more than happy to help, then he asked for a charity that he can donate to instead. I was just a guy who uploaded the app he built for himself, and not only did I help a handicapped senior from the other half of the world, a charity was getting a donation because of me! I was speechless.
If I had taken a perfectionist decision, I wouldn’t have released this app. If I hadn’t spared the small amount of time to put this online, I wouldn’t have released this app. There were so many reasons not to release it, but I did it anyway, and it took only one person to make me appreciate my decision.
I have 3 other apps on the App Store alongside Angles in Photo: One app for cross-multiplication (yes, I made an app for that, and yes, people use it), another one for checking the glycemic index of a food (I was quite obsessed with my nutrition once, we’ve all been there), and another one that I built when Safari was getting very slow on my old iPhone so I decided to build the simplest web browser that doesn’t do 1000 things in the background. Some of them have advertisements to help me pay my bills, but they’re all free to use. People do use them, and people do give feedback, although I never show the care I’m supposed to – but that’s the whole point, and if I was obsessed with that, I wouldn’t have kept them online, and no one would be using them.
You might not always appreciate what you do, but that shouldn’t mean that other people won’t. If they won’t, you won’t lose anything, but if they do, then you realize that something that’s too little for you might mean a lot to someone else.
Oh, I had another feedback for Angles in Photo, saying “Helped me get through my divorce”. I can’t imagine how that happened, but, there you go!
Swift was announced at WWDC 2014, and at the end of 2015, it was made open-source under the Apache License 2.0 (with some exceptions). If you have been following along since the beginning, the language had so many changes, especially on the surface (syntax), that after some period of time they almost became a developer joke, like whether the changes were to rename methodX to aMethodX in the next release (credits to good ol’ Xcode who would do the most of the migration automatically).
This is, of course, also due to the nature of the open-source software. The exception with Swift is, in my opinion, that it now became a software language that’s (well, to a certain degree) community-driven, but also has the resources to continue its evolution, having a tech titan behind. It’s hard to argue with the assessment that this is an amazing thing for the community and the software itself.
One of the things that I like about the open-source software development is the transparency. You are able opt-in all the events in the life of a feature even from the very beginning. Which means, if you really want to, you can even be a part of the change yourself. If not, you can just keep monitoring and get excited about it until it’s released, and who knows, maybe you will already be a master of the feature by the time it’s released!
If you are here before async/await is released or announced very publicly (I guess it means to get promoted during WWDC, etc.), then you are probably in the second group I mentioned above. After raising awareness regarding what a great thing open-source software is, we can finally talk about it.
Why?
There’s this proposal that’s made for the feature and I’ll try to summarize it below, leaving some comments. It makes sense to start with the “why” which is explained very well in the “Motivation” section of the proposal, roughly as follows:
Problem 1: Pyramid of doom
The pyramid of doom is a common problem that arises when a program uses many levels of nested indentation to control access to a function.
Closures. As soon as we learned how to use them, we started building these pyramids ourselves, embedding one closure in another. Apparently, over time it became so disturbing for everyone that it is mentioned as the first reason for this change.
Problem 2: Error handling
Callbacks make error handling difficult and very verbose. (…) The addition of Result to the standard library improved on error handling for Swift APIs. Asynchronous APIs were one of the main motivators for Result. It’s easier to handle errors when using Result, but the closure-nesting problem remains.
Problem 3: Conditional execution is hard and error-prone
If you really wonder what that really means, see here, but basically, the problem is:
This pattern inverts the natural top-down organization of the function: the code that will execute in the second half of the function must appear before the part that executes in the first half.
Even though I agree with the problem, the example that was given in the link doesn’t seem like the perfect fit, I mean, why don’t you just create a new method rather than creating a closure and assign it to a constant? But anyway, this doesn’t change the fact that this problem does exist when you can’t just export the code into a method.
Problem 4: Many mistakes are easy to make
It’s quite easy to bail-out of the asynchronous operation early by simply returning without calling the correct completion-handler block.
It simply means that you have something to do as soon as your closure is about to exit, but if you have lots of conditions inside of your closure and in some of them you exit the closure earlier, it’s easy to forget your last step code before exiting the closure. This happened to me many times, I’m sure it happened to you as well.
Problem 5: Because completion handlers are awkward, too many APIs are defined synchronously
Seriously? That’s just… Sad.
I think everything above is somewhat reasonable, but the ones that I agree with the most are #1 and #4.
Solution in a nutshell
Asynchronous functions—often known as async/await—allow asynchronous code to be written as if it were straight-line, synchronous code.
@asnycHandler func printDelayedVar() {
let delayedVar = await self.getMyDelayedVar()
print(delayedVar)
}
func getMyDelayedVar() async -> Int {
// Code to be revealed in the rest of the article
}
No reason to worry because of your pyramids getting lost. We still neste things within one another inside of the async methods, but at least we call our async method like a synchronous method in printDelayedVar. I guess the pyramids are just getting… Smaller?
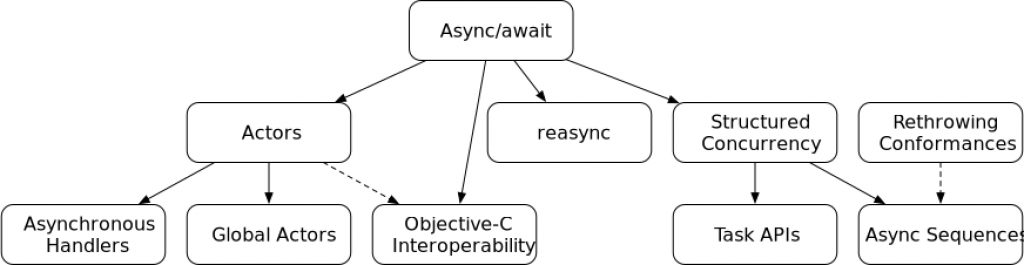
Before moving further, I want to make a disclaimer that the part that I’m covering in this post is simply the tip of the iceberg. In the announcement post of the approval of this proposal, the review manager says:
This is an important first step on our concurrency journey. To help navigate how this proposal relates to expected future proposals, this diagram should be of help:
Swift Concurrency Dependencies
As you can see, concurrency in Swift is in fact just getting warmed up. If you want to learn more about this feature, see the References section at the end of the page.
async/await hands on
Before experimenting with this syntax, there are a couple of things we need to do:
1. Download and install the latest* development snapshot from swift.org.
* Some things might have changed until the time you read this post, so try this alternative snapshot if things work out differently for you after you install.
2. Configure Xcode to use the respective toolchain
Open Xcode and from the Xcode menu, select Toolchains -> Swift Development Snapshot YYYY-mm-dd. You can do the same through Preferences -> Components -> Toolchains.
3. Add flags to enable experimental feature
From your Project’s build settings, find Swift Compiler - Custom Flags section and add the following flags to Other Swift Flags section: -Xfrontend -enable-experimental-concurrency.
4. Import experimental concurrency module
Add import _Concurrency to the header of the file that you are going to use for experimenting the feature. Note the underscore (_) in the beginning of the name of the module which indicates that it’s yet under development.
Done! You can now use async/await in your code. Xcode won’t highlight them yet but it will nicely compile and won’t block your way.
How to use async/await
By the time this feature is released, it’s quite likely that Apple will have converted some (hopefully many) asynchronous methods to async, but right now, we need to build our own async method. To do that, we will use a helper that comes with the _Concurrency module, that is, withUnsafeContinuation. We’ll come to that in a second.
The “sad” code (what we already do)
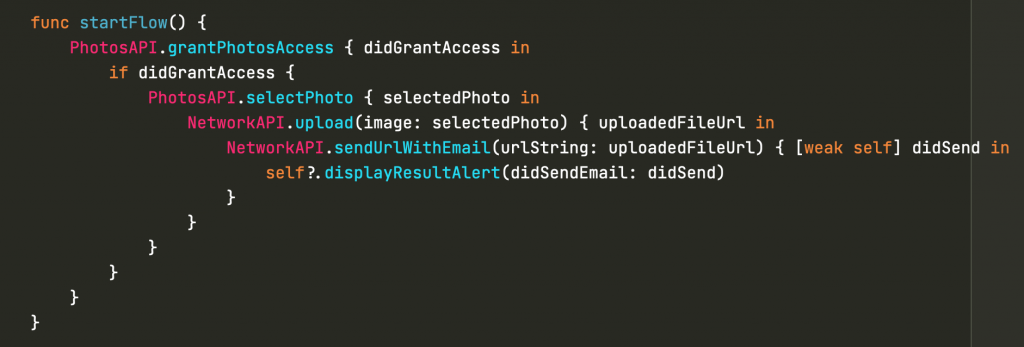
Assuming what you see below is the code you want to rewrite using async/await because you are unhappy with it (because of the problems we mentioned above):
class SendSelectedPhotoWithEmailViewController: UIViewController {
    func startFlow() {
        // Get access to user's photo library, when the access is granted, display photo picker.
        // When the user picks a photo, first upload it to the server, then send the uploaded file URL
        // via email. Finally, show the user the result of the process.
        PhotosAPI.grantPhotosAccess { didGrantAccess in
            if didGrantAccess {
                PhotosAPI.selectPhoto { selectedPhoto in
                    NetworkAPI.upload(image: selectedPhoto) { uploadedFileUrl in
                        NetworkAPI.sendUrlWithEmail(urlString: uploadedFileUrl) { [weak self] didSend in
                            self?.displayResultAlert(didSendEmail: didSend)
                        }
                    }
                }
            }
        }
    }
}
We will not convert every method above since the logic is almost the same. We will just convert one for demonstration and refactor the other lines as if the corresponding methods were also converted.
Let’s pick NetworkAPI.upload(image:completion:) method. If we were mocking the API and faking the network delay using sleep, the method would be something like this:
Problem 1: Our method deals with asynchronous code so it cannot return anything. That’s why it takes a closure where it passes the result.
Problem 2: When we use the trailing closure syntax in the place we call this method and embed such methods within each other, things get out of control.
The “happy” code (async/await)
Here, let’s create a method step by step, keeping the problem duo above in mind, and hopefully fix them.
We start with the method signature. If we want to get rid of the closure, we need our method to return the value that we pass into the closure. Something like:
static func upload(image: UIImage) -> String
Now, when we create the method body, the compiler will say “Missing return in a function expected to return 'String'“.
This is fine. That’s what we’re aiming to fix with async/await. But how?
withUnsafeContinuation
We can think of withUnsafeContinuation as a wrapper that you use around your asynchronous code which blocks the thread until you explicitly resume. If you write tests for your asynchronous code, you should be familiar with this pattern from using XCTestExpectation and its fulfill method.
static func upload(image: UIImage) -> String {
    withUnsafeContinuation { continuation in // Compiler error 1: "'async' in a function that does not support concurrency"
        DispatchQueue.main.async {
            sleep(1) // Fake wait
            completion("fake URL") // Compiler error 2: "Cannot find 'completion' in scope"
        }
    }
}
So the compiler is not yet content. The second error is something we are familar with, but the first one is new: “'async' in a function that does not support concurrency“.
My developer instincts tell me to mark this function somehow to tell the compiler that it supports concurrency. Maybe make it more explicit that my function is… async.
actually works! Why did I put async there and not somewhere else in the signature? Well, maybe I tried different places until it doesn’t produce an error, who knows!
For the second error, “Cannot find 'completion' in scope“, I’m just going to go ahead and remove that line. Sometimes you just need to ignore your problems until they’re gone, right?
We have a new compiler error, “Call is 'async' but is not marked with 'await'” but it’s so easy to fix that even Xcode itself offers a solution. We just mark our call with await.
We just wrote a couple of lines and barely did what we wanted to, but our code compiles… Some things are missing, right? Like a puzzle. Let’s go one by one:
Our method signature returns a String, but the method body doesn’t return anything yet it still compiles.
The answer is Swift 5.1, or more specifically, “Implicit returns from single-expression functions”. So our method actually does return something, and that is the result of the withUnsafeContinuation method. But maybe it’s a good idea to make return explicit to avoid confusion.
In the original method, we would return a string using the completion block, here we just erased it and didn’t put anything else instead.
Fair point. But we can’t just return something in the body of DispatchQueue.main.async (“Unexpected non-void return value in void function“), so there must be a different way of doing that. Maybe calling a method?
withUnsafeContinuation passes a value of type UnsafeContinuation into its closure but we never use it. What is it for?
There’s only one way to figure it out: To play with it. When we try to use it, we see that it has only one method available, which is continuation.resume(returning:). Could it be the method we were looking for in the previous problem?
Now we can finalize our method using continuation.resume(returning:). The complete version looks like this:
Time to get a pulse-check. In the “sad” code above, we mentioned two problems so let’s refresh our memories and note down our progress:
Problem 1: Our method deals with asynchronous code so it cannot return anything. That’s why it takes a closure where it passes the result.
This is now fixed as the method returns a String in the signature and the method body is updated accordingly.
Problem 2: When we use the trailing closure syntax in the place we call this method and embed such methods within each other, things get out of control.
This is not yet fixed because we didn’t refactor the part we call this method, but it doesn’t take a closure anymore so we made good progress there.
It’s time to use our new method, so let’s scrap everything in startFlow() and just call this new method:
func startFlow() {
    let url = NetworkAPI.upload(image: UIImage(named: "an-image")!) // Compiler error: "'async' in a function that does not support concurrency"
}
Well, we are familiar with the compiler error but something different happens when we use Xcode suggestion to correct this: The method gets marked with @asyncHandler. Okay, our method is literally an async handler so the signature feels right, let’s leave it as it is. And the new error “Call is 'async' but is not marked with 'await'” is also easy to fix, we just mark our call with await and we have the following:
What do you think? Much cleaner, right? There’s one last thing we didn’t talk about, that is @asyncHandler.
@asyncHandler
We can think of @asyncHandler like a stamp you use in the method signature to tell the compiler that your method does not return anything but just handles other async functions. When you mark your method with @asyncHandler, you can use it in other methods without having to mark them with @asyncHandler or async. Consider @asyncHandler as the last wrapper in your async code because eventually, you need to call these methods from a method that you can’t touch the signature, for instance, from UIViewController overrides.
Final words
As a final recap, let’s see the code before async/await:
Here’s the code with async/await:
As you can see, the new code is almost no different than a synchronous code block but the code is more readable and more manageable compared to the one with closures, thanks to async/await. I hope this post helped you get familiar with how async/await works and you are as excited about the future of concurrency in Swift as I am. Feel free to leave a comment on this post or send me a tweet on Twitter.