When you want to create a circle in SpriteKit, SKShapeNode is the quickest and the simplest way for it. You don’t need to create images, you can manage the size, fill colour, stroke colours etc.
However, if you want this node to involve with collisions, you may get some trouble when creating an SKPhysicsBody for that node. The creating process is similar to SKSpriteNode but the alignment of it is different.
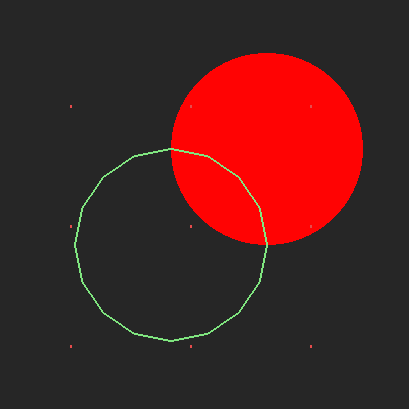
By default, SKShapeNode anchor points begin from (0, 0) and there isn’t any property to set it as we want. When we assign a SKPhysicsBody to this node, body’s anchor is its center point so the body doesn’t cover the node correctly.
Here’s how it looks when you want to implement for SKShapeNode as you do in SKSpriteNode:
There are plenty of people who were unable to solve this issue. Yet there is one answer on SO that helped me out with this.
To work around this situation, you can create an SKSpriteNode to implement the body and an SKShapeNode as the SKSpriteNode’s child to draw the shape.
First, create an SKSpriteNode and set the width and height same with the diameter of the circle
float radius = 30.0;
SKSpriteNode *aCircle = [SKSpriteNode spriteNodeWithColor:[UIColor clearColor] size:CGSizeMake(radius * 2, radius * 2)];
Then create a circular SKPhysicsBody for the SKSpriteNode (thankfully, this is possible)
SKPhysicsBody *circleBody = [SKPhysicsBody bodyWithCircleOfRadius:radius];
[circleBody setDynamic:NO];
[circleBody setUsesPreciseCollisionDetection:YES];
[aCircle circleBody];
Here is the key part. Create a CGPathRef as an ellipse in the rect with correct center values.
CGPathRef bodyPath = CGPathCreateWithEllipseInRect(CGRectMake(-[aCircle size].width / 2, -[aCircle size].height / 2, [aCircle size].width, [aCircle size].width), nil);
SKShapeNode *circleShape = [SKShapeNode node];
[circleShape setFillColor:[UIColor redColor]];
[circleShape setLineWidth:0];
[circleShape setPath:bodyPath];
[aCircle addChild:circleShape];
CGPathRelease(bodyPath);
Don’t forget to add the child to the scene then you are done. As you can see below, the physics body now matches the node frame correctly.
Source link of the answer:
SKPhysicsBody not as expected
Other questions about similar issues:
How to align SKPhysicsBody and SKShapeNode?
Align SKPhysicsBody with SKShapeNode
SKPhysicsBody does not work on SKShapeNode
SKshapenode is not responding to Physicsbody
how to make collisions with skshapenode circles
Keeping an SKShapeNode within the bounds of an SKSpriteNode